> ## Documentation Index
> Fetch the complete documentation index at: https://agent-observability-docs.splunk.com/llms.txt
> Use this file to discover all available pages before exploring further.
# Log Your First Trace
> Learn how to log your first trace with Splunk Agent Observability
## Create a Splunk Agent Observability Account
First, navigate to your Splunk Agent Observability homepage and create an account.
## Add your first trace
This guide works with Python, using OpenAI, Azure OpenAI service, Anthropic, or Gemini LLMs.
Install the **Splunk Agent Observability SDK** with OpenAI support and the dotenv package using the following command in your terminal:
```bash Python theme={null}
pip install "splunk-ao[openai]" python-dotenv
```
Create an `.env` file in your project folder, and set:
* Your [Splunk Agent Observability API key](/references/faqs/find-keys#splunk-ao-api-key)
* Your [Splunk Agent Observability Console URL](/references/faqs/find-keys#splunk-ao-console-url)
* Your [OpenAI API Key](https://platform.openai.com/settings/organization/api-keys)
```ini .env theme={null}
# If you are using an on-premises, standalone, or custom deployment
# provide your API key and console URL below
SPLUNK_AO_API_KEY="your-splunk-ao-api-key"
SPLUNK_AO_CONSOLE_URL="your-splunk-ao-console-url"
OPENAI_API_KEY="your-openai-api-key"
```
Having trouble setting up your .env file? [Visit this guide](/references/faqs/find-keys)
Create a file called `app.py` (Python) and add the following code:
```python Python theme={null}
from splunk_ao import splunk_ao_context
from splunk_ao.openai import openai
from splunk_ao.config import SplunkAOConfig
from dotenv import load_dotenv
# Load environment variables from the .env file
load_dotenv()
# Set the Project and Agent Stream; these are created if they don't exist.
# You can also set these using the SPLUNK_AO_PROJECT and SPLUNK_AO_AGENT_STREAM
# environment variables.
print("🔭 Connecting to Splunk Agent Observability...")
splunk_ao_context.init(project="MyFirstEvaluation",
agent_stream="MyFirstAgentStream")
print("✅ Splunk-AO logging initialized.\n")
# Initialize the Splunk Agent Observability OpenAI client wrapper
client = openai.OpenAI()
# Define a system prompt with guidance
system_prompt = f"""
You are a helpful assistant that wants to provide a user as much
information as possible. Avoid saying I don't know.
"""
# Define a user prompt
user_prompt = "Plan a trip for me"
model_name = "gpt-5.6-terra"
# Send a request to the LLM
print(f"🤖 Asking {model_name}... (this may take a moment)")
response = client.chat.completions.create(
model=model_name,
messages=[
{"role": "system", "content": system_prompt},
{"role": "user", "content": user_prompt}
],
)
print("✅ Response received.\n")
response_text = response.choices[0].message.content.strip()
# Print the response
print(response_text)
# Show Splunk Agent Observability information after the response
config = SplunkAOConfig.get()
logger = splunk_ao_context.get_logger_instance()
project_url = f"{config.console_url}project/{logger.project_id}"
agent_stream_url = f"{project_url}/agent-streams/{logger.agent_stream_id}"
print()
print("🚀 SPLUNK-AO INFORMATION:")
print(f"🔗 Project : {project_url}")
print(f"📝 Agent Stream: {agent_stream_url}")
```
This code will create a new project in Splunk Agent Observability called **MyFirstEvaluation**, with an Agent Stream called **MyFirstAgentStream**. It will then log a trace using the call to the LLM.
This code uses a default LLM model. If you want to use a different model, update the `model_name`.
Run your application using the following command in your terminal:
```bash Python theme={null}
python app.py
```
You can see the model's output in your terminal:
```output Terminal wrap theme={null}
I'd be happy to help plan your trip! To create an itinerary that fits your needs, please share a few details:
1. Where would you like to go?
2. What are your travel dates or preferred trip length?
3. Where will you be traveling from?
4. What is your approximate budget?
5. How many people are traveling?
6. What activities or experiences interest you?
Once I have these details, I can suggest transportation, accommodations, activities, and a day-by-day itinerary.
```
The model asks for the information it needs to plan the trip. The exact response might differ depending on the model and when you run the application.
The output will also contain links to your project and Agent Stream in Splunk Agent Observability.
```output Terminal wrap theme={null}
🚀 SPLUNK-AO INFORMATION:
🔗 Project : /project/...
📝 Agent Stream: /project/.../agent-streams/...
```
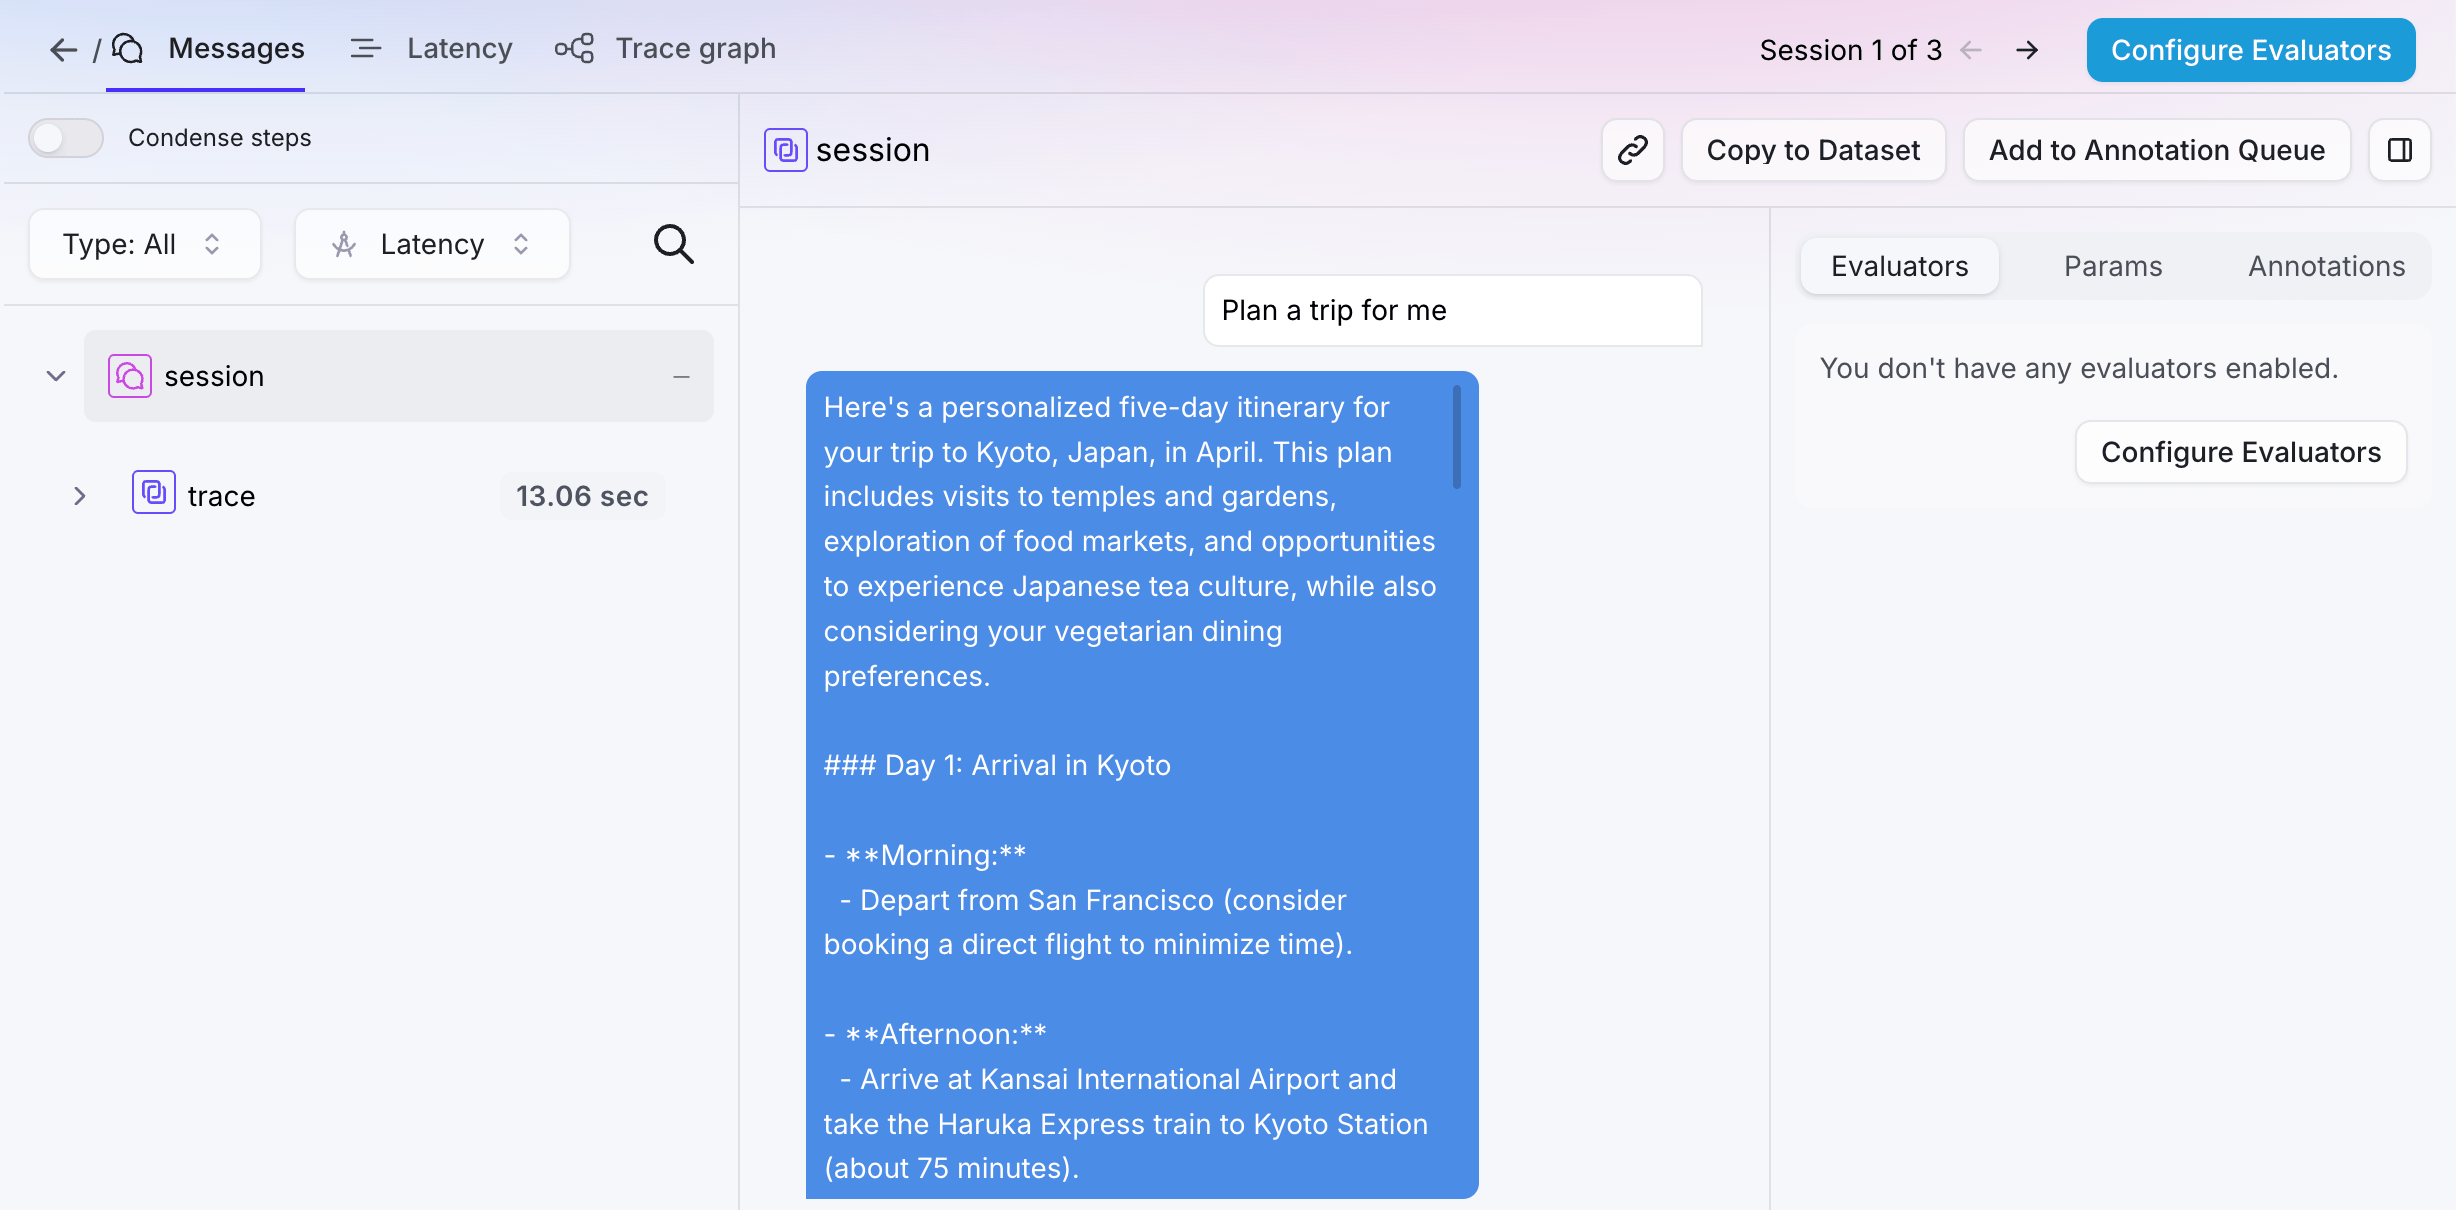
Open the Agent Stream for your project in the Splunk Agent Observability UI using the URL output to your terminal. You will see the logged trace.
 Select the trace, then navigate to the **Messages** tab to see details of the trace.
 Install the **Splunk Agent Observability SDK**, the Anthropic SDK, and the dotenv package using the following command in your terminal:
```bash Python theme={null}
pip install splunk-ao python-dotenv anthropic
```
Create an `.env` file in your project folder, and set:
* Your [Splunk Agent Observability API key](/references/faqs/find-keys#splunk-ao-api-key)
* Your [Splunk Agent Observability Console URL](/references/faqs/find-keys#splunk-ao-console-url)
* Your [Anthropic API key](https://console.anthropic.com/settings/keys)
```ini .env theme={null}
# If you are using an on-premises, standalone, or custom deployment
# provide your API key and console URL below
SPLUNK_AO_API_KEY="your-splunk-ao-api-key"
SPLUNK_AO_CONSOLE_URL="your-splunk-ao-console-url"
ANTHROPIC_API_KEY="your-anthropic-api-key"
```
Having trouble setting up your .env file? [Visit this guide](/references/faqs/find-keys)
Create a file called `app.py` (Python) and add the following code:
```python Python theme={null}
from datetime import datetime
from anthropic import Anthropic
from dotenv import load_dotenv
from splunk_ao import splunk_ao_context
from splunk_ao.config import SplunkAOConfig
# Load environment variables from the .env file
load_dotenv()
# Set the Project and Agent Stream; these are created if they don't exist.
# You can also set these using the SPLUNK_AO_PROJECT and SPLUNK_AO_AGENT_STREAM
# environment variables.
print("🔭 Connecting to Splunk Agent Observability...")
splunk_ao_context.init(project="MyFirstEvaluation",
agent_stream="MyFirstAgentStream")
print("✅ Splunk-AO logging initialized.\n")
# Get the Splunk Agent Observability logger instance
logger = splunk_ao_context.get_logger_instance()
# Start a Splunk Agent Observability session
logger.start_session()
# Initialize the Anthropic client
client = Anthropic()
# Define a system prompt with guidance
system_prompt = f"""
You are a helpful assistant that wants to provide a user as much
information as possible. Avoid saying I don't know.
"""
# Define a user prompt
user_prompt = "Plan a trip for me"
model_name = "claude-sonnet-5"
# Start a trace
logger.start_trace(name="Conversation step", input=user_prompt)
# Define the messages to send
messages = [
{"role": "user", "content": user_prompt}
]
# Capture the current time in nanoseconds for logging
start_time_ns = datetime.now().timestamp() * 1_000_000_000
# Send a request to the LLM
print(f"🤖 Asking {model_name}... (this may take a moment)")
response = client.messages.create(
max_tokens=1024,
messages=messages,
system=system_prompt,
model=model_name,
)
print("✅ Response received.\n")
response_text = response.content[0].text
logged_messages = [{"role": "system", "content": system_prompt}] + messages
# Log an LLM span using the response from Anthropic
logger.add_llm_span(
input=logged_messages,
output=response.content[0].text,
model=model_name,
num_input_tokens=response.usage.input_tokens,
num_output_tokens=response.usage.output_tokens,
total_tokens=response.usage.input_tokens + response.usage.output_tokens,
duration_ns=(datetime.now().timestamp() * 1_000_000_000) - start_time_ns,
)
# Conclude and flush the logger
logger.conclude(output=response.content[0].text)
logger.flush()
# Print the response
print(response_text)
# Show Splunk Agent Observability information after the response
config = SplunkAOConfig.get()
project_url = f"{config.console_url}project/{logger.project_id}"
agent_stream_url = f"{project_url}/agent-streams/{logger.agent_stream_id}"
print()
print("🚀 SPLUNK-AO INFORMATION:")
print(f"🔗 Project : {project_url}")
print(f"📝 Agent Stream: {agent_stream_url}")
```
This will create a new project in Splunk Agent Observability called **MyFirstEvaluation**, with an Agent Stream called **MyFirstAgentStream**. It will then log a trace using the call to the LLM.
This code uses a default LLM model. If you want to use a different model, update the `model_name`.
Run your application using the following command in your terminal:
```bash Python theme={null}
python app.py
```
You can see the model's output in your terminal:
```output Terminal wrap theme={null}
I'd be happy to help plan your trip! To create an itinerary that fits your needs, please share a few details:
1. Where would you like to go?
2. What are your travel dates or preferred trip length?
3. Where will you be traveling from?
4. What is your approximate budget?
5. How many people are traveling?
6. What activities or experiences interest you?
Once I have these details, I can suggest transportation, accommodations, activities, and a day-by-day itinerary.
```
The model asks for the information it needs to plan the trip. The exact response might differ depending on the model and when you run the application.
The output will also contain links to your project and Agent Stream in Splunk Agent Observability.
```output Terminal wrap theme={null}
🚀 SPLUNK-AO INFORMATION:
🔗 Project : /project/...
📝 Agent Stream: /project/.../agent-streams/...
```
Open the Agent Stream for your project in the Splunk Agent Observability UI using the URL output to your terminal. You will see the logged trace.
Select the trace, then navigate to the **Messages** tab to see details of the trace.
Install the **Splunk Agent Observability SDK**, the Google GenAI SDK, and the dotenv package using the following command in your terminal:
```bash Python theme={null}
pip install splunk-ao python-dotenv google-genai
```
Create an `.env` file in your project folder, and set:
* Your [Splunk Agent Observability API key](/references/faqs/find-keys#splunk-ao-api-key)
* Your [Splunk Agent Observability Console URL](/references/faqs/find-keys#splunk-ao-console-url)
* Your [Gemini API key](https://aistudio.google.com/apikey)
```ini .env theme={null}
# If you are using an on-premises, standalone, or custom deployment
# provide your API key and deployment URL below
# SPLUNK_AO_API_KEY="your-splunk-ao-api-key"
# SPLUNK_AO_CONSOLE_URL="your-splunk-ao-console-url"
GEMINI_API_KEY="your-gemini-api-key"
```
Having trouble setting up your .env file? [Visit this guide](/references/faqs/find-keys)
Create a file called `app.py` (Python) and add the following code:
```python Python theme={null}
from datetime import datetime
from dotenv import load_dotenv
from google import genai
from google.genai import types
from splunk_ao import splunk_ao_context
from splunk_ao.config import SplunkAOConfig
# Load environment variables from the .env file
load_dotenv()
# Set the Project and Agent Stream; these are created if they don't exist.
# You can also set these using the SPLUNK_AO_PROJECT and SPLUNK_AO_AGENT_STREAM
# environment variables.
print("🔭 Connecting to Splunk Agent Observability...")
splunk_ao_context.init(project="MyFirstEvaluation",
agent_stream="MyFirstAgentStream")
print("✅ Splunk AO logging initialized.\n")
# Get the Splunk Agent Observability logger instance
logger = splunk_ao_context.get_logger_instance()
# Start a Splunk Agent Observability session
logger.start_session()
# Initialize the Gemini client
client = genai.Client()
# Define a system prompt with guidance
system_prompt = f"""
You are a helpful assistant that wants to provide a user as much
information as possible. Avoid saying I don't know.
"""
# Define a user prompt
user_prompt = "Plan a trip for me"
model_name = "gemini-3.6-flash"
# Start a trace
logger.start_trace(name="Conversation step", input=user_prompt)
# Capture the current time in nanoseconds for logging
start_time_ns = datetime.now().timestamp() * 1_000_000_000
# Send a request to the LLM
print(f"🤖 Asking {model_name}... (this may take a moment)")
response = client.models.generate_content(
model=mode_name,
config=types.GenerateContentConfig(
system_instruction=system_prompt),
contents=user_prompt
)
print("✅ Response received.\n")
response_text = response.text or ""
# Log an LLM span using the response from Gemini
logger.add_llm_span(
input=[
{"role": "system", "content": system_prompt},
{"role": "user", "content": user_prompt}
],
output=response_text,
model=model_name,
num_input_tokens=response.usage_metadata.prompt_token_count,
num_output_tokens=response.usage_metadata.candidates_token_count,
total_tokens=response.usage_metadata.total_token_count,
duration_ns=(datetime.now().timestamp() * 1_000_000_000) - start_time_ns,
)
# Conclude and flush the logger
logger.conclude(output=response_text)
logger.flush()
# Print the response
print(response_text)
# Show Splunk Agent Observability information after the response
config = SplunkAOConfig.get()
project_url = f"{config.console_url}project/{logger.project_id}"
agent_stream_url = f"{project_url}/agent-streams/{logger.agent_stream_id}"
print()
print("🚀 SPLUNK-AO INFORMATION:")
print(f"🔗 Project : {project_url}")
print(f"📝 Agent Stream: {agent_stream_url}")
```
This will create a new project in Splunk Agent Observability called **MyFirstEvaluation**, with an Agent Stream called **MyFirstAgentStream**. It will then log a trace using the call to the LLM.
This code uses a default LLM model. If you want to use a different model, update the `model_name`.
Run your application using the following command in your terminal:
```bash Python theme={null}
python app.py
```
You can see the model's output in your terminal:
```output Terminal wrap theme={null}
I'd be happy to help plan your trip! To create an itinerary that fits your needs, please share a few details:
1. Where would you like to go?
2. What are your travel dates or preferred trip length?
3. Where will you be traveling from?
4. What is your approximate budget?
5. How many people are traveling?
6. What activities or experiences interest you?
Once I have these details, I can suggest transportation, accommodations, activities, and a day-by-day itinerary.
```
The model asks for the information it needs to plan the trip. The exact response might differ depending on the model and when you run the application.
The output will also contain links to your project and Agent Stream in Splunk Agent Observability.
```output Terminal wrap theme={null}
🚀 SPLUNK-AO INFORMATION:
🔗 Project : /project/...
📝 Agent Stream: /project/.../agent-streams/...
```
Open the Agent Stream for your project in the Splunk Agent Observability UI using the URL output to your terminal. You will see the logged trace.
Select the trace, then navigate to the **Messages** tab to see details of the trace.
Install the **Splunk Agent Observability SDK** with OpenAI support and the dotenv package using the following command in your terminal:
```bash Python theme={null}
pip install "splunk-ao[openai]" python-dotenv
```
Create an `.env` file in your project folder, and set:
* Your [Splunk Agent Observability API key](/references/faqs/find-keys#splunk-ao-api-key)
* Your [Splunk Agent Observability Console URL](/references/faqs/find-keys#splunk-ao-console-url)
* Your Azure OpenAI Service API key
* Your Azure OpenAI Service endpoint
```ini .env theme={null}
# If you are using an on-premises, standalone, or custom deployment
# provide your API key and deployment URL below
# SPLUNK_AO_API_KEY="your-splunk-ao-api-key"
# SPLUNK_AO_CONSOLE_URL="your-splunk-ao-console-url"
AZURE_OPENAI_API_KEY="your-azure-openai-api-key"
AZURE_OPENAI_ENDPOINT="your-azure-openai-api-key"
```
Create a file called `app.py` (Python) and add the following code:
```python Python theme={null}
from splunk_ao import splunk_ao_context
from splunk_ao.openai import openai
from splunk_ao.config import SplunkAOConfig
from dotenv import load_dotenv
# Load environment variables from the .env file
load_dotenv()
# Set the Project and Agent Stream; these are created if they don't exist.
# You can also set these using the SPLUNK_AO_PROJECT and SPLUNK_AO_AGENT_STREAM
# environment variables.
print("🔭 Connecting to Splunk Agent Observability...")
splunk_ao_context.init(project="MyFirstEvaluation",
agent_stream="MyFirstAgentStream")
print("✅ Splunk AO logging initialized.\n")
# Initialize the Splunk Agent Observability Azure OpenAI client
client = openai.AzureOpenAI(api_version="2024-12-01-preview")
# Define a system prompt with guidance
system_prompt = f"""
You are a helpful assistant that wants to provide a user as much
information as possible. Avoid saying I don't know.
"""
# Define a user prompt
user_prompt = "Plan a trip for me"
model_name = "gpt-5.6-terra"
# Send a request to the LLM
print(f"🤖 Asking {model_name}... (this may take a moment)")
response = client.chat.completions.create(
model=model_name,
messages=[
{"role": "system", "content": system_prompt},
{"role": "user", "content": user_prompt}
],
)
print("✅ Response received.\n")
response_text = response.choices[0].message.content.strip()
# Print the response
print(response_text)
# Show Splunk Agent Observability information after the response
config = SplunkAOConfig.get()
logger = splunk_ao_context.get_logger_instance()
project_url = f"{config.console_url}project/{logger.project_id}"
agent_stream_url = f"{project_url}/agent-streams/{logger.agent_stream_id}"
print()
print("🚀 SPLUNK-AO INFORMATION:")
print(f"🔗 Project : {project_url}")
print(f"📝 Agent Stream: {agent_stream_url}")
```
This will create a new project in Splunk Agent Observability called **MyFirstEvaluation**, with an Agent Stream called **MyFirstAgentStream**. It will then log a trace using the call to the LLM.
This code uses a default LLM model. If you want to use a different model, update the `model_name`.
Run your application using the following command in your terminal:
```bash Python theme={null}
python app.py
```
You can see the model's output in your terminal:
```output Terminal wrap theme={null}
I'd be happy to help plan your trip! To create an itinerary that fits your needs, please share a few details:
1. Where would you like to go?
2. What are your travel dates or preferred trip length?
3. Where will you be traveling from?
4. What is your approximate budget?
5. How many people are traveling?
6. What activities or experiences interest you?
Once I have these details, I can suggest transportation, accommodations, activities, and a day-by-day itinerary.
```
The model asks for the information it needs to plan the trip. The exact response might differ depending on the model and when you run the application.
The output will also contain links to your project and Agent Stream in Splunk Agent Observability.
```output Terminal wrap theme={null}
🚀 SPLUNK-AO INFORMATION:
🔗 Project : /project/...
📝 Agent Stream: /project/.../agent-streams/...
```
Open the Agent Stream for your project in the Splunk Agent Observability UI using the URL output to your terminal. You will see the logged trace.
Select the trace, then navigate to the **Messages** tab to see details of the trace.
Install the **Splunk Agent Observability SDK**, the AWS SDK, and the dotenv package using the following command in your terminal:
```bash Python theme={null}
pip install splunk-ao python-dotenv boto3
```
Create an `.env` file in your project folder, and set:
* Your [Splunk Agent Observability API key](/references/faqs/find-keys#splunk-ao-api-key)
* Your [Splunk Agent Observability Console URL](/references/faqs/find-keys#splunk-ao-console-url)
```ini .env theme={null}
# If you are using an on-premises, standalone, or custom deployment
# provide your API key and deployment URL below
# SPLUNK_AO_API_KEY="your-splunk-ao-api-key"
# SPLUNK_AO_CONSOLE_URL="your-splunk-ao-console-url"
```
Set up your AWS credentials to allow access to Bedrock. You can do this by [configuring the AWS CLI](https://docs.aws.amazon.com/cli/latest/userguide/cli-configure-files.html) or by setting the following environment variables:
```bash Terminal theme={null}
export AWS_ACCESS_KEY_ID=your-access-key-id
export AWS_SECRET_ACCESS_KEY=your-secret-access-key
export AWS_REGION=your-AWS_region
```
Alternatively, use an [Amazon Bedrock API key](https://docs.aws.amazon.com/bedrock/latest/userguide/api-keys-generate.html).
```bash Terminal theme={null}
export AWS_BEARER_TOKEN_BEDROCK=your-api-key
```
Create a file called `app.py` (Python) and add the following code:
```python Python theme={null}
from datetime import datetime
from dotenv import load_dotenv
import os
import boto3
import json
from splunk_ao import splunk_ao_context
from splunk_ao.config import SplunkAOConfig
# Load environment variables from the .env file
load_dotenv()
# Set the Project and Agent Stream; these are created if they don't exist.
# You can also set these using the SPLUNK_AO_PROJECT and SPLUNK_AO_AGENT_STREAM
# environment variables.
print("🔭 Connecting to Splunk Agent Observability...")
splunk_ao_context.init(project="MyFirstEvaluation",
agent_stream="MyFirstAgentStream")
print("✅ Splunk AO logging initialized.\n")
# Get the Splunk Agent Observability logger instance
logger = splunk_ao_context.get_logger_instance()
# Start a Splunk Agent Observability session
logger.start_session()
# Initialize the Amazon Bedrock Runtime client.
brt = boto3.client(
service_name='bedrock-runtime',
region_name=os.environ.get('AWS_DEFAULT_REGION', 'us-east-1')
)
# Define a system prompt with guidance
system_prompt = """
You are a helpful assistant that wants to provide a user as much
information as possible. Avoid saying I don't know.
"""
# Define a user prompt
user_prompt = "Plan a trip for me"
model_name = "us.anthropic.claude-sonnet-4-5-20250929-v1:0"
# Start a trace
logger.start_trace(name="Conversation step", input=user_prompt)
# Capture the current time in nanoseconds for logging
start_time_ns = datetime.now().timestamp() * 1_000_000_000
# Format the request for AWS Bedrock
# following the Anthropic Claude API structure.
native_request = {
"anthropic_version": "bedrock-2023-05-31",
"max_tokens": 512,
"temperature": 0.7,
"system": system_prompt.strip(),
"messages": [
{
"role": "user",
"content": user_prompt
}
]
}
# Convert the native request to JSON.
request = json.dumps(native_request)
# Send a request to the LLM with AWS Bedrock
print(f"🤖 Asking {model_name}... (this may take a moment)")
try:
# Invoke the model with the request.
response = brt.invoke_model(modelId=model_name, body=request)
except (ClientError, Exception) as e:
print(f"ERROR: Can't invoke '{model_name}'. Reason: {e}")
exit(1)
print("✅ Response received.\n")
# Decode the response body.
model_response = json.loads(response["body"].read())
# Extract the response text from Claude's format
response_text = model_response["content"][0]["text"]
# Log an LLM span using the response from Claude
logged_messages = [
{"role": "system", "content": system_prompt},
{"role": "user", "content": user_prompt}
]
logger.add_llm_span(
input=logged_messages,
output=response_text,
model=model_name,
num_input_tokens=model_response["usage"]["input_tokens"],
num_output_tokens=model_response["usage"]["output_tokens"],
total_tokens=model_response["usage"]["input_tokens"] + model_response["usage"]["output_tokens"],
duration_ns=(datetime.now().timestamp() * 1_000_000_000) - start_time_ns,
)
# Conclude and flush the logger
logger.conclude(output=response_text)
logger.flush()
# Print the response
print(f"\n🤖 Response:\n{response_text}\n")
# Show Splunk Agent Observability information after the response
config = SplunkAOConfig.get()
project_url = f"{config.console_url}project/{logger.project_id}"
agent_stream_url = f"{project_url}/agent-streams/{logger.agent_stream_id}"
print()
print("🚀 SPLUNK-AO INFORMATION:")
print(f"🔗 Project : {project_url}")
print(f"📝 Agent Stream: {agent_stream_url}")
```
This will create a new project in Splunk Agent Observability called **MyFirstEvaluation**, with an Agent Stream called **MyFirstAgentStream**. It will then log a trace using the call to the LLM.
This code uses a default LLM model. If you want to use a different model, update the `model_name`.
Run your application using the following command in your terminal:
```bash Python theme={null}
python app.py
```
You can see the model's output in your terminal:
```output Terminal wrap theme={null}
I'd be happy to help plan your trip! To create an itinerary that fits your needs, please share a few details:
1. Where would you like to go?
2. What are your travel dates or preferred trip length?
3. Where will you be traveling from?
4. What is your approximate budget?
5. How many people are traveling?
6. What activities or experiences interest you?
Once I have these details, I can suggest transportation, accommodations, activities, and a day-by-day itinerary.
```
The model asks for the information it needs to plan the trip. The exact response might differ depending on the model and when you run the application.
The output will also contain links to your project and Agent Stream in Splunk Agent Observability.
```output Terminal wrap theme={null}
🚀 SPLUNK-AO INFORMATION:
🔗 Project : /project/...
📝 Agent Stream: /project/.../agent-streams/...
```
Open the Agent Stream for your project in the Splunk Agent Observability UI using the URL output to your terminal. You will see the logged trace.
Select the trace, then navigate to the **Messages** tab to see details of the trace.
🎉 **Congratulations**, you have logged your first trace! Your [next step is to evaluate this trace using Splunk Agent Observability evaluators](/getting-started/evaluate-and-improve/evaluate-and-improve), and use this evaluation to improve the LLM prompts to get a better response.
## Troubleshooting
* **I need a Splunk Agent Observability API key**: [Visit this guide](/references/faqs/find-keys#splunk-ao-api-key)
* **What's my project name and Agent Stream name?**: These names were set when you created a new project. If you haven't created a new project, head to Splunk Agent Observability and select the **New Project** button.
## Next steps
Learn how to create evaluators for your trace with Splunk Agent Observability and improve your application.
Learn how to get started with the Splunk Agent Observability sample projects that are included in every new account.
Learn about the Splunk Agent Observability integrations with third-party SDKs to automatically log your applications.
### Cookbooks
Learn how to perform common tasks with Splunk Agent Observability, work with third-party integrations, and use evaluations to solve AI problems.
### SDK reference
The Splunk Agent Observability Python SDK reference.
Install the **Splunk Agent Observability SDK**, the Anthropic SDK, and the dotenv package using the following command in your terminal:
```bash Python theme={null}
pip install splunk-ao python-dotenv anthropic
```
Create an `.env` file in your project folder, and set:
* Your [Splunk Agent Observability API key](/references/faqs/find-keys#splunk-ao-api-key)
* Your [Splunk Agent Observability Console URL](/references/faqs/find-keys#splunk-ao-console-url)
* Your [Anthropic API key](https://console.anthropic.com/settings/keys)
```ini .env theme={null}
# If you are using an on-premises, standalone, or custom deployment
# provide your API key and console URL below
SPLUNK_AO_API_KEY="your-splunk-ao-api-key"
SPLUNK_AO_CONSOLE_URL="your-splunk-ao-console-url"
ANTHROPIC_API_KEY="your-anthropic-api-key"
```
Having trouble setting up your .env file? [Visit this guide](/references/faqs/find-keys)
Create a file called `app.py` (Python) and add the following code:
```python Python theme={null}
from datetime import datetime
from anthropic import Anthropic
from dotenv import load_dotenv
from splunk_ao import splunk_ao_context
from splunk_ao.config import SplunkAOConfig
# Load environment variables from the .env file
load_dotenv()
# Set the Project and Agent Stream; these are created if they don't exist.
# You can also set these using the SPLUNK_AO_PROJECT and SPLUNK_AO_AGENT_STREAM
# environment variables.
print("🔭 Connecting to Splunk Agent Observability...")
splunk_ao_context.init(project="MyFirstEvaluation",
agent_stream="MyFirstAgentStream")
print("✅ Splunk-AO logging initialized.\n")
# Get the Splunk Agent Observability logger instance
logger = splunk_ao_context.get_logger_instance()
# Start a Splunk Agent Observability session
logger.start_session()
# Initialize the Anthropic client
client = Anthropic()
# Define a system prompt with guidance
system_prompt = f"""
You are a helpful assistant that wants to provide a user as much
information as possible. Avoid saying I don't know.
"""
# Define a user prompt
user_prompt = "Plan a trip for me"
model_name = "claude-sonnet-5"
# Start a trace
logger.start_trace(name="Conversation step", input=user_prompt)
# Define the messages to send
messages = [
{"role": "user", "content": user_prompt}
]
# Capture the current time in nanoseconds for logging
start_time_ns = datetime.now().timestamp() * 1_000_000_000
# Send a request to the LLM
print(f"🤖 Asking {model_name}... (this may take a moment)")
response = client.messages.create(
max_tokens=1024,
messages=messages,
system=system_prompt,
model=model_name,
)
print("✅ Response received.\n")
response_text = response.content[0].text
logged_messages = [{"role": "system", "content": system_prompt}] + messages
# Log an LLM span using the response from Anthropic
logger.add_llm_span(
input=logged_messages,
output=response.content[0].text,
model=model_name,
num_input_tokens=response.usage.input_tokens,
num_output_tokens=response.usage.output_tokens,
total_tokens=response.usage.input_tokens + response.usage.output_tokens,
duration_ns=(datetime.now().timestamp() * 1_000_000_000) - start_time_ns,
)
# Conclude and flush the logger
logger.conclude(output=response.content[0].text)
logger.flush()
# Print the response
print(response_text)
# Show Splunk Agent Observability information after the response
config = SplunkAOConfig.get()
project_url = f"{config.console_url}project/{logger.project_id}"
agent_stream_url = f"{project_url}/agent-streams/{logger.agent_stream_id}"
print()
print("🚀 SPLUNK-AO INFORMATION:")
print(f"🔗 Project : {project_url}")
print(f"📝 Agent Stream: {agent_stream_url}")
```
This will create a new project in Splunk Agent Observability called **MyFirstEvaluation**, with an Agent Stream called **MyFirstAgentStream**. It will then log a trace using the call to the LLM.
This code uses a default LLM model. If you want to use a different model, update the `model_name`.
Run your application using the following command in your terminal:
```bash Python theme={null}
python app.py
```
You can see the model's output in your terminal:
```output Terminal wrap theme={null}
I'd be happy to help plan your trip! To create an itinerary that fits your needs, please share a few details:
1. Where would you like to go?
2. What are your travel dates or preferred trip length?
3. Where will you be traveling from?
4. What is your approximate budget?
5. How many people are traveling?
6. What activities or experiences interest you?
Once I have these details, I can suggest transportation, accommodations, activities, and a day-by-day itinerary.
```
The model asks for the information it needs to plan the trip. The exact response might differ depending on the model and when you run the application.
The output will also contain links to your project and Agent Stream in Splunk Agent Observability.
```output Terminal wrap theme={null}
🚀 SPLUNK-AO INFORMATION:
🔗 Project : /project/...
📝 Agent Stream: /project/.../agent-streams/...
```
Open the Agent Stream for your project in the Splunk Agent Observability UI using the URL output to your terminal. You will see the logged trace.
Select the trace, then navigate to the **Messages** tab to see details of the trace.
Install the **Splunk Agent Observability SDK**, the Google GenAI SDK, and the dotenv package using the following command in your terminal:
```bash Python theme={null}
pip install splunk-ao python-dotenv google-genai
```
Create an `.env` file in your project folder, and set:
* Your [Splunk Agent Observability API key](/references/faqs/find-keys#splunk-ao-api-key)
* Your [Splunk Agent Observability Console URL](/references/faqs/find-keys#splunk-ao-console-url)
* Your [Gemini API key](https://aistudio.google.com/apikey)
```ini .env theme={null}
# If you are using an on-premises, standalone, or custom deployment
# provide your API key and deployment URL below
# SPLUNK_AO_API_KEY="your-splunk-ao-api-key"
# SPLUNK_AO_CONSOLE_URL="your-splunk-ao-console-url"
GEMINI_API_KEY="your-gemini-api-key"
```
Having trouble setting up your .env file? [Visit this guide](/references/faqs/find-keys)
Create a file called `app.py` (Python) and add the following code:
```python Python theme={null}
from datetime import datetime
from dotenv import load_dotenv
from google import genai
from google.genai import types
from splunk_ao import splunk_ao_context
from splunk_ao.config import SplunkAOConfig
# Load environment variables from the .env file
load_dotenv()
# Set the Project and Agent Stream; these are created if they don't exist.
# You can also set these using the SPLUNK_AO_PROJECT and SPLUNK_AO_AGENT_STREAM
# environment variables.
print("🔭 Connecting to Splunk Agent Observability...")
splunk_ao_context.init(project="MyFirstEvaluation",
agent_stream="MyFirstAgentStream")
print("✅ Splunk AO logging initialized.\n")
# Get the Splunk Agent Observability logger instance
logger = splunk_ao_context.get_logger_instance()
# Start a Splunk Agent Observability session
logger.start_session()
# Initialize the Gemini client
client = genai.Client()
# Define a system prompt with guidance
system_prompt = f"""
You are a helpful assistant that wants to provide a user as much
information as possible. Avoid saying I don't know.
"""
# Define a user prompt
user_prompt = "Plan a trip for me"
model_name = "gemini-3.6-flash"
# Start a trace
logger.start_trace(name="Conversation step", input=user_prompt)
# Capture the current time in nanoseconds for logging
start_time_ns = datetime.now().timestamp() * 1_000_000_000
# Send a request to the LLM
print(f"🤖 Asking {model_name}... (this may take a moment)")
response = client.models.generate_content(
model=mode_name,
config=types.GenerateContentConfig(
system_instruction=system_prompt),
contents=user_prompt
)
print("✅ Response received.\n")
response_text = response.text or ""
# Log an LLM span using the response from Gemini
logger.add_llm_span(
input=[
{"role": "system", "content": system_prompt},
{"role": "user", "content": user_prompt}
],
output=response_text,
model=model_name,
num_input_tokens=response.usage_metadata.prompt_token_count,
num_output_tokens=response.usage_metadata.candidates_token_count,
total_tokens=response.usage_metadata.total_token_count,
duration_ns=(datetime.now().timestamp() * 1_000_000_000) - start_time_ns,
)
# Conclude and flush the logger
logger.conclude(output=response_text)
logger.flush()
# Print the response
print(response_text)
# Show Splunk Agent Observability information after the response
config = SplunkAOConfig.get()
project_url = f"{config.console_url}project/{logger.project_id}"
agent_stream_url = f"{project_url}/agent-streams/{logger.agent_stream_id}"
print()
print("🚀 SPLUNK-AO INFORMATION:")
print(f"🔗 Project : {project_url}")
print(f"📝 Agent Stream: {agent_stream_url}")
```
This will create a new project in Splunk Agent Observability called **MyFirstEvaluation**, with an Agent Stream called **MyFirstAgentStream**. It will then log a trace using the call to the LLM.
This code uses a default LLM model. If you want to use a different model, update the `model_name`.
Run your application using the following command in your terminal:
```bash Python theme={null}
python app.py
```
You can see the model's output in your terminal:
```output Terminal wrap theme={null}
I'd be happy to help plan your trip! To create an itinerary that fits your needs, please share a few details:
1. Where would you like to go?
2. What are your travel dates or preferred trip length?
3. Where will you be traveling from?
4. What is your approximate budget?
5. How many people are traveling?
6. What activities or experiences interest you?
Once I have these details, I can suggest transportation, accommodations, activities, and a day-by-day itinerary.
```
The model asks for the information it needs to plan the trip. The exact response might differ depending on the model and when you run the application.
The output will also contain links to your project and Agent Stream in Splunk Agent Observability.
```output Terminal wrap theme={null}
🚀 SPLUNK-AO INFORMATION:
🔗 Project : /project/...
📝 Agent Stream: /project/.../agent-streams/...
```
Open the Agent Stream for your project in the Splunk Agent Observability UI using the URL output to your terminal. You will see the logged trace.
Select the trace, then navigate to the **Messages** tab to see details of the trace.
Install the **Splunk Agent Observability SDK** with OpenAI support and the dotenv package using the following command in your terminal:
```bash Python theme={null}
pip install "splunk-ao[openai]" python-dotenv
```
Create an `.env` file in your project folder, and set:
* Your [Splunk Agent Observability API key](/references/faqs/find-keys#splunk-ao-api-key)
* Your [Splunk Agent Observability Console URL](/references/faqs/find-keys#splunk-ao-console-url)
* Your Azure OpenAI Service API key
* Your Azure OpenAI Service endpoint
```ini .env theme={null}
# If you are using an on-premises, standalone, or custom deployment
# provide your API key and deployment URL below
# SPLUNK_AO_API_KEY="your-splunk-ao-api-key"
# SPLUNK_AO_CONSOLE_URL="your-splunk-ao-console-url"
AZURE_OPENAI_API_KEY="your-azure-openai-api-key"
AZURE_OPENAI_ENDPOINT="your-azure-openai-api-key"
```
Create a file called `app.py` (Python) and add the following code:
```python Python theme={null}
from splunk_ao import splunk_ao_context
from splunk_ao.openai import openai
from splunk_ao.config import SplunkAOConfig
from dotenv import load_dotenv
# Load environment variables from the .env file
load_dotenv()
# Set the Project and Agent Stream; these are created if they don't exist.
# You can also set these using the SPLUNK_AO_PROJECT and SPLUNK_AO_AGENT_STREAM
# environment variables.
print("🔭 Connecting to Splunk Agent Observability...")
splunk_ao_context.init(project="MyFirstEvaluation",
agent_stream="MyFirstAgentStream")
print("✅ Splunk AO logging initialized.\n")
# Initialize the Splunk Agent Observability Azure OpenAI client
client = openai.AzureOpenAI(api_version="2024-12-01-preview")
# Define a system prompt with guidance
system_prompt = f"""
You are a helpful assistant that wants to provide a user as much
information as possible. Avoid saying I don't know.
"""
# Define a user prompt
user_prompt = "Plan a trip for me"
model_name = "gpt-5.6-terra"
# Send a request to the LLM
print(f"🤖 Asking {model_name}... (this may take a moment)")
response = client.chat.completions.create(
model=model_name,
messages=[
{"role": "system", "content": system_prompt},
{"role": "user", "content": user_prompt}
],
)
print("✅ Response received.\n")
response_text = response.choices[0].message.content.strip()
# Print the response
print(response_text)
# Show Splunk Agent Observability information after the response
config = SplunkAOConfig.get()
logger = splunk_ao_context.get_logger_instance()
project_url = f"{config.console_url}project/{logger.project_id}"
agent_stream_url = f"{project_url}/agent-streams/{logger.agent_stream_id}"
print()
print("🚀 SPLUNK-AO INFORMATION:")
print(f"🔗 Project : {project_url}")
print(f"📝 Agent Stream: {agent_stream_url}")
```
This will create a new project in Splunk Agent Observability called **MyFirstEvaluation**, with an Agent Stream called **MyFirstAgentStream**. It will then log a trace using the call to the LLM.
This code uses a default LLM model. If you want to use a different model, update the `model_name`.
Run your application using the following command in your terminal:
```bash Python theme={null}
python app.py
```
You can see the model's output in your terminal:
```output Terminal wrap theme={null}
I'd be happy to help plan your trip! To create an itinerary that fits your needs, please share a few details:
1. Where would you like to go?
2. What are your travel dates or preferred trip length?
3. Where will you be traveling from?
4. What is your approximate budget?
5. How many people are traveling?
6. What activities or experiences interest you?
Once I have these details, I can suggest transportation, accommodations, activities, and a day-by-day itinerary.
```
The model asks for the information it needs to plan the trip. The exact response might differ depending on the model and when you run the application.
The output will also contain links to your project and Agent Stream in Splunk Agent Observability.
```output Terminal wrap theme={null}
🚀 SPLUNK-AO INFORMATION:
🔗 Project : /project/...
📝 Agent Stream: /project/.../agent-streams/...
```
Open the Agent Stream for your project in the Splunk Agent Observability UI using the URL output to your terminal. You will see the logged trace.
Select the trace, then navigate to the **Messages** tab to see details of the trace.
Install the **Splunk Agent Observability SDK**, the AWS SDK, and the dotenv package using the following command in your terminal:
```bash Python theme={null}
pip install splunk-ao python-dotenv boto3
```
Create an `.env` file in your project folder, and set:
* Your [Splunk Agent Observability API key](/references/faqs/find-keys#splunk-ao-api-key)
* Your [Splunk Agent Observability Console URL](/references/faqs/find-keys#splunk-ao-console-url)
```ini .env theme={null}
# If you are using an on-premises, standalone, or custom deployment
# provide your API key and deployment URL below
# SPLUNK_AO_API_KEY="your-splunk-ao-api-key"
# SPLUNK_AO_CONSOLE_URL="your-splunk-ao-console-url"
```
Set up your AWS credentials to allow access to Bedrock. You can do this by [configuring the AWS CLI](https://docs.aws.amazon.com/cli/latest/userguide/cli-configure-files.html) or by setting the following environment variables:
```bash Terminal theme={null}
export AWS_ACCESS_KEY_ID=your-access-key-id
export AWS_SECRET_ACCESS_KEY=your-secret-access-key
export AWS_REGION=your-AWS_region
```
Alternatively, use an [Amazon Bedrock API key](https://docs.aws.amazon.com/bedrock/latest/userguide/api-keys-generate.html).
```bash Terminal theme={null}
export AWS_BEARER_TOKEN_BEDROCK=your-api-key
```
Create a file called `app.py` (Python) and add the following code:
```python Python theme={null}
from datetime import datetime
from dotenv import load_dotenv
import os
import boto3
import json
from splunk_ao import splunk_ao_context
from splunk_ao.config import SplunkAOConfig
# Load environment variables from the .env file
load_dotenv()
# Set the Project and Agent Stream; these are created if they don't exist.
# You can also set these using the SPLUNK_AO_PROJECT and SPLUNK_AO_AGENT_STREAM
# environment variables.
print("🔭 Connecting to Splunk Agent Observability...")
splunk_ao_context.init(project="MyFirstEvaluation",
agent_stream="MyFirstAgentStream")
print("✅ Splunk AO logging initialized.\n")
# Get the Splunk Agent Observability logger instance
logger = splunk_ao_context.get_logger_instance()
# Start a Splunk Agent Observability session
logger.start_session()
# Initialize the Amazon Bedrock Runtime client.
brt = boto3.client(
service_name='bedrock-runtime',
region_name=os.environ.get('AWS_DEFAULT_REGION', 'us-east-1')
)
# Define a system prompt with guidance
system_prompt = """
You are a helpful assistant that wants to provide a user as much
information as possible. Avoid saying I don't know.
"""
# Define a user prompt
user_prompt = "Plan a trip for me"
model_name = "us.anthropic.claude-sonnet-4-5-20250929-v1:0"
# Start a trace
logger.start_trace(name="Conversation step", input=user_prompt)
# Capture the current time in nanoseconds for logging
start_time_ns = datetime.now().timestamp() * 1_000_000_000
# Format the request for AWS Bedrock
# following the Anthropic Claude API structure.
native_request = {
"anthropic_version": "bedrock-2023-05-31",
"max_tokens": 512,
"temperature": 0.7,
"system": system_prompt.strip(),
"messages": [
{
"role": "user",
"content": user_prompt
}
]
}
# Convert the native request to JSON.
request = json.dumps(native_request)
# Send a request to the LLM with AWS Bedrock
print(f"🤖 Asking {model_name}... (this may take a moment)")
try:
# Invoke the model with the request.
response = brt.invoke_model(modelId=model_name, body=request)
except (ClientError, Exception) as e:
print(f"ERROR: Can't invoke '{model_name}'. Reason: {e}")
exit(1)
print("✅ Response received.\n")
# Decode the response body.
model_response = json.loads(response["body"].read())
# Extract the response text from Claude's format
response_text = model_response["content"][0]["text"]
# Log an LLM span using the response from Claude
logged_messages = [
{"role": "system", "content": system_prompt},
{"role": "user", "content": user_prompt}
]
logger.add_llm_span(
input=logged_messages,
output=response_text,
model=model_name,
num_input_tokens=model_response["usage"]["input_tokens"],
num_output_tokens=model_response["usage"]["output_tokens"],
total_tokens=model_response["usage"]["input_tokens"] + model_response["usage"]["output_tokens"],
duration_ns=(datetime.now().timestamp() * 1_000_000_000) - start_time_ns,
)
# Conclude and flush the logger
logger.conclude(output=response_text)
logger.flush()
# Print the response
print(f"\n🤖 Response:\n{response_text}\n")
# Show Splunk Agent Observability information after the response
config = SplunkAOConfig.get()
project_url = f"{config.console_url}project/{logger.project_id}"
agent_stream_url = f"{project_url}/agent-streams/{logger.agent_stream_id}"
print()
print("🚀 SPLUNK-AO INFORMATION:")
print(f"🔗 Project : {project_url}")
print(f"📝 Agent Stream: {agent_stream_url}")
```
This will create a new project in Splunk Agent Observability called **MyFirstEvaluation**, with an Agent Stream called **MyFirstAgentStream**. It will then log a trace using the call to the LLM.
This code uses a default LLM model. If you want to use a different model, update the `model_name`.
Run your application using the following command in your terminal:
```bash Python theme={null}
python app.py
```
You can see the model's output in your terminal:
```output Terminal wrap theme={null}
I'd be happy to help plan your trip! To create an itinerary that fits your needs, please share a few details:
1. Where would you like to go?
2. What are your travel dates or preferred trip length?
3. Where will you be traveling from?
4. What is your approximate budget?
5. How many people are traveling?
6. What activities or experiences interest you?
Once I have these details, I can suggest transportation, accommodations, activities, and a day-by-day itinerary.
```
The model asks for the information it needs to plan the trip. The exact response might differ depending on the model and when you run the application.
The output will also contain links to your project and Agent Stream in Splunk Agent Observability.
```output Terminal wrap theme={null}
🚀 SPLUNK-AO INFORMATION:
🔗 Project : /project/...
📝 Agent Stream: /project/.../agent-streams/...
```
Open the Agent Stream for your project in the Splunk Agent Observability UI using the URL output to your terminal. You will see the logged trace.
Select the trace, then navigate to the **Messages** tab to see details of the trace.
🎉 **Congratulations**, you have logged your first trace! Your [next step is to evaluate this trace using Splunk Agent Observability evaluators](/getting-started/evaluate-and-improve/evaluate-and-improve), and use this evaluation to improve the LLM prompts to get a better response.
## Troubleshooting
* **I need a Splunk Agent Observability API key**: [Visit this guide](/references/faqs/find-keys#splunk-ao-api-key)
* **What's my project name and Agent Stream name?**: These names were set when you created a new project. If you haven't created a new project, head to Splunk Agent Observability and select the **New Project** button.
## Next steps
Learn how to create evaluators for your trace with Splunk Agent Observability and improve your application.
Learn how to get started with the Splunk Agent Observability sample projects that are included in every new account.
Learn about the Splunk Agent Observability integrations with third-party SDKs to automatically log your applications.
### Cookbooks
Learn how to perform common tasks with Splunk Agent Observability, work with third-party integrations, and use evaluations to solve AI problems.
### SDK reference
The Splunk Agent Observability Python SDK reference.